I stumbled across this on the HGTV website the other day and there is some really useful information in this article and thought I would share this with everyone. Here are some fabulous tips from Mark Lipinski - enjoy!
Instructions provided courtesy of quilt designer Mark Lipinski.
Organizing Your Sewing Room
Thread Spool Storage: Store thread spools in clear plastic egg cartons. These are also great for stacking.
Burn Test: To identify fabric content, burn a corner of a piece of scrap fabric (figure A) and extinguish it in a bowl of water. Cotton will feather with a light ash as it's burned; poly blend will feel like plastic when it is burned.
Paint Chip Tip: Create your own color library with complementary paint chips available at home decorating stores. Paint chips are easy to take along when shopping for fabric.
Cutting Mat Cleanup: Clean your rotary cutting mat with a napped lint-removal brush. This prevents dark or light lint from depositing on your next cut of fabric.
Stop Unraveling Threads: Cut strips from inexpensive vinyl/cling wrap and wrap it around the spool and bobbin to secure the thread.
Rotary Care: To keep your rotary cutter sharp, mark the date of the blade change with masking tape on the flat part of the cutter. When your rotary cutter starts skipping, take it apart and turn the blade, add a drop of sewing machine oil and you get double the life on your blades.
Fabric Flags: To shop for fabric economically and efficiently, determine your fabric color scheme beforehand. Write down the colors and yardage required on individual sticky notes; i.e., border=3 yards, house=2 yards, grass=1/4 yard. As you choose a fabric bolt, stick the note on the end of the bolt and take it to the cutting table; after the fabric is cut, transfer the sticky notes to the cut fabric.
Washing Small Pieces: Place fat quarters of fabric in a mesh lingerie bag (figure B) to launder. Wash your fabric with other clothing items without losing the fabric and with minimal fraying.
Organize Blocks: Purchase medium and large pizza boxes to store quilt blocks. They are easy to stack and your blocks are organized. This works especially well if fabric is cut on the bias and handling it repeatedly can cause distortion.
Portable Flannel Wall: Purchase a flannel-backed vinyl tablecloth from a dollar store or buy flannel-backed vinyl at a fabric store. Hang the portable flannel wall near the ceiling with grommets and small finishing nails.
Flannel Carriers: Cut out large pieces from a flannel-backed tablecloth and roll it up to store quilt blocks and unroll it when you're ready to work on it.
Pants Hanger: Use a pants hanger to hold your pattern book to keep it from getting lost under fabric (figure C). Another great idea: use the hanger to hold a recipe book to keep it from being soiled. Hang the pants hanger from a bulletin board, a nail in the wall or a kitchen cabinet knob.
Breath Mint Box: Make a pin holder with a recycled breath mint box and magnetic sheets. Magnetic sheets can be purchased at a craft store.
Organizing Tools: Store sewing tools in a used silverware basket taken from an old dishwasher. It can hang on a pegboard too! Also, a revolving pencil holder works like magic for tool storage (figure D).
Trading Card Holders: Buy trading card dividers for needle storage and place them in a binder (figure E). Insert needles into felt or muslin squares that have been cut to the size of the dividers. The holders can also be used to store swatches of your fabric stash (figure F).
Prescription Bottles: Store thread spools in an old prescription bottle (figure G) to prevent the thread from tangling. Burn a hole in the lid with a hot nail for ease in controlling the thread. Bobbins can also be stored this way. Store discarded needles in an old prescription bottle too--this lessens the chance for needles to get lost in the carpet and thus avoid accidents.
Bobbins and Thread: Keep spools of thread and matching bobbins together by storing together on a large golf tee (figure H). Secure the bobbin and thread together with a rubber band.
Scissors Keeper: Attach an acrylic suction cup hook on the side of the sewing machine to hang small scissors or thread clippers (figure I).
Seam Ripper Holder: Tape a pen cap to the machine to hold the seam ripper (figure J).
Felt Arrows: Cut two giant arrows from felt and attach them to the design wall. The arrow reminds you which direction the seams must be pressed.
Page Reinforcement Stickers: To identify the front side of a quilting ruler, attach self-adhesive page reinforcement circles over the holes in rulers
Basting Guns: Organize and connect quilt blocks, block pieces and paperwork together with basting guns (figure L). They are also great for quick fixes for curtains and to secure buttons.
Organize Sewing Machine Needles: Divide a tomato pincushion into sections by labeling one machine needle number per section.
Glue Sticks: Store glue sticks in the refrigerator to keep them fresh and to avoid having them dry out or mold.
Fresh Flowers for Sewing Room: This recipe will keep flowers fresh for a week. Combine 1 capful of bleach, 2 teaspoons of sugar and 1 gallon of water. The bleach kills bacteria; the sugar gives the flowers energy.
Machine Tips
Stop Fabric Diving: Buy a single stitch plate for your sewing machine instead of using a slotted zigzag plate. It will be easier to begin new seams without the fabric sinking into the notch. In a pinch, use transparent tape to create a smaller hole.
Finger Traction: To improve traction for sliding fabric, use gardener's gloves, tips of rubber gloves, rubber fingertips or finger cots. Another tip: Use Sortkwik Fingertip Moistener or a similar gel product from an office supply store.
Avoiding Hunched Shoulders: Prop your sewing machine forward with inexpensive rubber doorstops (figure A).
Walking Sewing Machine and Foot Pedals: Place a rubber shelf liner, rubber bathtub liner or rubber place mat or mouse pad under your sewing machine and foot pedal to keep them stationary (figure B).
How to Achieve a 1/4" Seam: Align and attach moleskin, masking tape, electrical tape, sticky notes or even a magnet to the 1/4-inch guide (figure C).
Bobbin Case Maintenance: Never blow into your bobbin case as moisture can damage it. A feather, chenille pipe cleaner, child's paintbrush (figure D) or canned air is usually more effective than the small brushes that come with the sewing machine.
Threading Machine Needle: Libby Lehman's tip is to thread the needle by sliding the thread along the groove on the needle and it will thread into place. Another tip: Dip the tip of the thread into clear nail polish or take the needle out of the machine to thread it. Or try wetting the needle and not the thread.
Prevent Ruler Slipping: To prevent your ruler from slipping while cutting your fabric, squirt hot-glue dots onto the ruler to secure in place (figure E). (Hot-glue dots are easily removed.) Sandpaper dots work the same way. Create your own with sandpaper and a hole punch to keep ruler from slipping when cutting fabric. Plastic cling wrap can also be used to prevent slipping.
Measurement Guide: Use inexpensive electrical tape or masking tape as a guide for ruler measurements. If you are rotary cutting a quantity of strips, such as 2-1/4" widths, place masking tape at the bottom of the acrylic ruler. The tape nudges the edge of the fabric and ensures the correct measurement.
Breaking Thread: To moisturize old, dry thread and reduce breaking, place the spool in a plastic bag, spray lightly with water and refrigerate overnight.
See Dark Edges: Place a white or colored piece of paper under dark fabrics when rotary cutting on a dark mat so you can see the fabric edges more clearly.
Do It Yourself and Save
Iron With Joy: Make your own lavender water and save a mint (this is my most popular tip)! Combine 2 cups of distilled water, 2 ounces of cheap vodka and 15 to 20 drops of 100 percent essential oil of lavender (available at health food stores) or another scent. Add lavender water to iron and enjoy the aroma.
Age Spots on Quilts: To brighten colors and remove age spots and yellow discoloration from quilts, combine 1 gallon of water and 1 quart of buttermilk with 1 tablespoon lemon juice (figure A). Soak the quilt in this liquid and hand-wash with a mild soap for a reconditioned bright quilt. The natural ingredients are safe with no danger of damaging the quilt.
Homemade Spray Starch: Boil 1 quart of water. Dissolve 4 tablespoons of liquid starch into 2 cups of cold water; add to boiling water and return to a boil, then remove from heat immediately; add 2 more cups of cold water. Starch should be clear and not milky. Place it in a mist spray bottle (figure B) and store in the refrigerator. This is extremely cost-effective--only 2 cents a quart. Clean the iron with a wet terry towel.
Displaying Unfinished Quilt Tops: Iron a long strip of freezer paper to the wrong side of the border's edge. This also prevents unraveling.
Strip Piecing Time-Saver: Organize and store cut fabric strips by hanging them on an over-the-door towel rack or a wooden or plastic drying rack.
Pin Magnets: Pick up loose pins quickly with a flat refrigerator magnet, rather than buying expensive magnet wands. Tape a magnet to your sewing machine to pick up/secure pins.
Eraser: Erase snippets of thread after seam ripping with a Pink Pearl eraser or pencil eraser.
Stilettos: Instead of buying expensive stilettos for sewing, use either a cuticle stick, kabob (bamboo) skewer (figure C) or a pick-up stick.
Reducing Glasses: Instead of purchasing an expensive reducing glass, buy a door peephole from the hardware store. Or look through your binoculars backward or use a camera lens to view the quilt. Alex Anderson suggests putting your back to the quilt and using a hand mirror to view it (figure D)!
Cheap Templates: Glass supply stores or automobile glass replacement shops can make Plexiglas templates. Transparent squares and triangles are easy and perfect for fussy cutting a large quilt (figure E).
Budget Buying: Use a permanent fabric marker to write the name of the fabric collection, the style and color numbers, the quilt shop of purchase and the price per yard on the selvage of the fabric--just in case you run out and need the exact fabric to complete your quilting project.
Fusible Webbing: Use parchment paper instead of expensive fusible sheets. It will save money and also prevents glue from adhering to the iron's surface.
Cleaning Your Iron: To remove starch burns, fusible webbing or plastic, run a hot iron over salt on a brown paper bag (figure F). If the iron is Teflon coated, run it over salt on used or new dryer sheets.
Pinpointing Your Hand-Quilting Place: Tie a milk bottle cap with holes punched into it and sew it in place where you last stitched (figure G). Untie the cap and begin quilting. It's a big time-saver!
courtesy:
Mark Lipinski
Quilt Designer
The Quilts of Pickle Road
13 Pickle Rd.
Califon, NJ 07830
Phone: 908-876-1208
Website: www.marklipinski.com

Sunday, July 25, 2010
Monday, July 19, 2010
New Items!
New in the Shop!
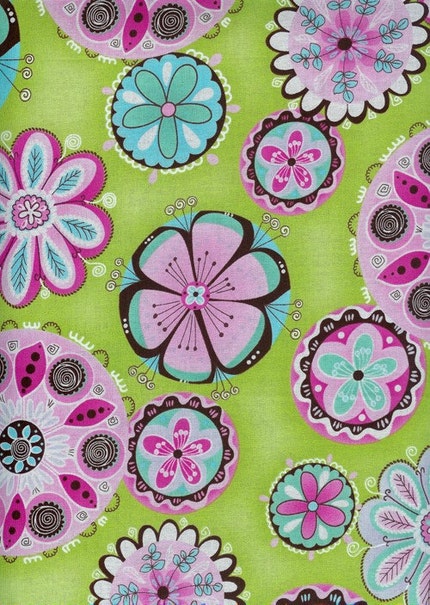
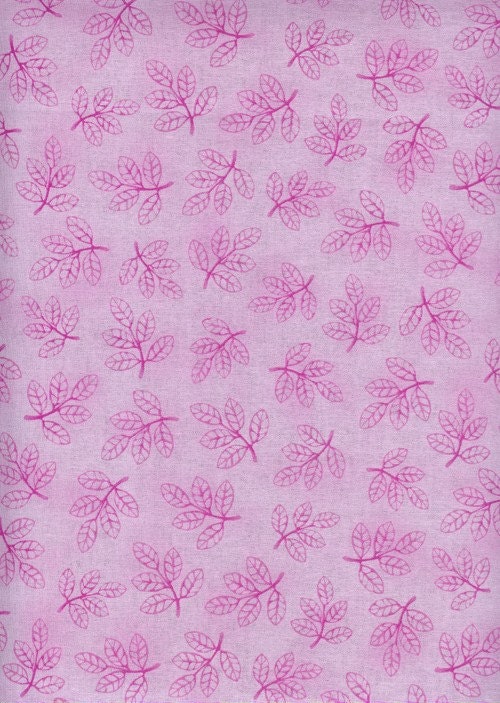
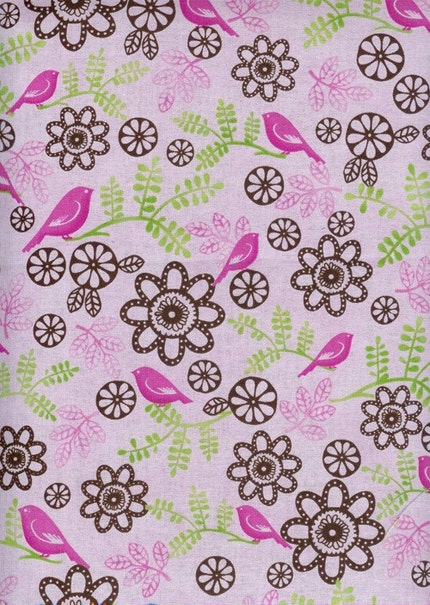
"Acorn" by Alice Kennedy for Timeless Treasures. This line is very girly and would be great for a custom outfit. I like the Lime flowers for a bag, too - lovely! The smaller scale birds and branches would work well for doll clothing. Very cute!
 "Castle Peeps" by Lizzy House for Andover - I love this fabric! It has a lovely, soft feel to it. The print is vibrant and fun. I am planning on ordering more!


I have a few more odds and ends listed. Those items are more limited, check the "Quantity" on the item detail screen and if you see anything you like, make sure to grab it - popular items go quickly!
"Acorn" by Alice Kennedy for Timeless Treasures. This line is very girly and would be great for a custom outfit. I like the Lime flowers for a bag, too - lovely! The smaller scale birds and branches would work well for doll clothing. Very cute!
I have a few more odds and ends listed. Those items are more limited, check the "Quantity" on the item detail screen and if you see anything you like, make sure to grab it - popular items go quickly!
Sunday, July 18, 2010
Friday Feature (a little late) - Oliver+S Patterns
One thing I hear frequently from customer is that they wish they could sew or sew better. I feel the same way! I don't get the time to hone my skills as much as I wish I could. One thing that has made me more confident in my sewing abilities are the line of patterns from Oliver+S.


To get you started and build your confidence, Oliver + S has created several simple, free patterns: the Lazy Days Skirt, the Popover Sundress, and the new Ruffled Halter. These to teach beginning sewing classes for young mothers who may be intimidated by garment sewing. Once you have some confidence with these patterns, check out the recommendations from the Learn to Sew with Oliver + S syllabus which will help you build your skills.

To get you motivated to try the free Lazy Days pattern, purchase a half yard or more of any fabric from the shop and mention "Lazy Days" in the Comments to Seller and I will send you a free yard of coordinating solid color Grosgrain Ribbon.
Do you have a story about using Oliver + S patterns? Please share it on my Facebook page. I am always eager to hear about your successes.
Founded by Liesl Gibson, former designer at Tommy Hilfiger and trained at New York’s Fashion Institute of Technology, these children's clothing patterns have a classic feel to them. The patterns are rated from "One Scissors" (Easy/Beginner) to "Four Scissors" (Advanced). Each pattern is like a little sewing lesson in an envelope. The instructions are clear and well written. The illustrations make it easy to understand and create your project.
To get you started and build your confidence, Oliver + S has created several simple, free patterns: the Lazy Days Skirt, the Popover Sundress, and the new Ruffled Halter. These to teach beginning sewing classes for young mothers who may be intimidated by garment sewing. Once you have some confidence with these patterns, check out the recommendations from the Learn to Sew with Oliver + S syllabus which will help you build your skills.
To get you motivated to try the free Lazy Days pattern, purchase a half yard or more of any fabric from the shop and mention "Lazy Days" in the Comments to Seller and I will send you a free yard of coordinating solid color Grosgrain Ribbon.
Do you have a story about using Oliver + S patterns? Please share it on my Facebook page. I am always eager to hear about your successes.
Tuesday, July 13, 2010
300!
That was quick! I have reached 300 "Likers" (fans) on Facebook!
 It's heartwarming to see all your faces and know that you are interested in what's going on in my little shop. In celebration of this milestone, please stop be the Facebook page and post a comment on the "300 Likers" post to enter to win a Priority Mail Flat Rate Envelope filled with fabric. I say its "Scraps", but my scraps are usually a half yard or more - great for small projects!
Thanks everyone!

Thanks everyone!
Wednesday, July 7, 2010
Tutorial Thursday - Scrappy Roses
These little fabric roses are popping up everywhere and I have discovered that they are a fantastic way to use up your scraps. These roses look great on headbands, clips or even a bobby pin. Add a pin back and decorate a bag or jacket. Accent a neckline on a plain tee or tank and add an instant vintage flair to your look. The best part is that they are very simple and quick to make. Don't let the look of them intimidate you, the shabbier they look, the better!
To start, decide how big you want your rose to be. For this demonstration, the rose will be about two inches wide. Start with a piece of fabric 2" wide and 44" long. I frequently cut this size piece off a bolt to straighten up yardage, so even a crooked piece will work. A narrower piece will create a flatter flower, a shorter piece of fabric will make a smaller rose.

You can also snip and tear for a frayed, shabby look. You can use any type of fabric to achieve different looks - velvet, corduroy, silk, knits and even lace or ribbon. Experiment with what you like. You can always make a flower to see how it looks, hold it in place and stitch later instead of making a more permanent decision like gluing along the way.
Next, fold your fabric in half the full width of the scrap. You can even fold as you go, no need to iron.

Now tie a knot at the end.

Start twisting and wrapping your fabric around the center knot. Twisting and folding as you go.

 Glue or stitch every half inch to secure. I am going to sew this together through all layers at the end, so I am holding this in place with pins for the photos.


When you get to the end or to the desired size, twist and secure the tail under the flower with a dab of glue or stitching.

You can now accent the center of your rose with a single bead or several if you are jazzy like that.
 That's it! All ready to attach to a clip, barrette, headband, bag, t-shirt, coat - anything! Can you believe how much you paid jcrew to do that?
To start, decide how big you want your rose to be. For this demonstration, the rose will be about two inches wide. Start with a piece of fabric 2" wide and 44" long. I frequently cut this size piece off a bolt to straighten up yardage, so even a crooked piece will work. A narrower piece will create a flatter flower, a shorter piece of fabric will make a smaller rose.

You can also snip and tear for a frayed, shabby look. You can use any type of fabric to achieve different looks - velvet, corduroy, silk, knits and even lace or ribbon. Experiment with what you like. You can always make a flower to see how it looks, hold it in place and stitch later instead of making a more permanent decision like gluing along the way.
Next, fold your fabric in half the full width of the scrap. You can even fold as you go, no need to iron.

Now tie a knot at the end.

Start twisting and wrapping your fabric around the center knot. Twisting and folding as you go.


When you get to the end or to the desired size, twist and secure the tail under the flower with a dab of glue or stitching.

You can now accent the center of your rose with a single bead or several if you are jazzy like that.

Tuesday, July 6, 2010
A New Collaboration for Doll Fans!
I am pleased and excited to announce that I will be working with Reggie from Reggie's Dolls on etsy!
 Reggie is based out of Oregon and she makes unique, sweet and fun handmade clothing for dolls. As part of our partnership, you will be able to select a listing from Reggie for an item - her listing will include all the labor involved in your selection - and then head over to my shop and select any fabric I have in my shop. You may have seen Reggie's work grace the dolls over at Bamboletta Dolls and she has been delighting children with her Waldorf Doll sized creations for several years.


Interested in having a custom outfit made? Here is what to do:
1. Head over to www.reggiesdolls.etsy.com and choose your pattern. Any of the items listed as "Waldorf Doll Create Your Own" are eligible.
2. Head over to the fabric shop: www.treasurebayfabrics.com or www.flamecranium.etsy.com and choose the fabric(s) you desire. Send me a convo and advise me which item you are ordering from Reggie.
3. Jump back over to Reggie's and when you check out with your custom spot, please note in the Comments to Seller - the name of the fabric you ordered and that its coming from Treasure Bay Fabrics.
You can order more then one listing and more than one fabric! If you need any help at all, don't worry, Reggie and I are here to help! Send a convo via etsy and we will help you get it all sorted.
Another part of this announcement is to state that in general, I will now offer any of my fabrics as a Fat Quarter sized cut - a Fat Quarter is 18x22 inches. Convo me for prices and setting up a listing.
Friday, July 2, 2010
Friday Before The Fourth
It's 10:00pm here and I am waiting for the laundry to finish up before I can pack my bags for a little Holiday weekend getaway. I am bringing my mile long "To Do" list with me but it's hard to say if I will be able to get much done. I have several dozen new fabrics to list (yum!), a whole lot of new patterns (swoon!) and quite a few fabulous new ribbons (whee!). Here is a little sneak peek:


 Have a safe and Happy Fourth of July, my friends!


Subscribe to:
Posts (Atom)